Visual Studio Code Extension Development
I don’t like long introductions in posts because you know what brought you here and don’t need the fluff. Let’s get right into it…
Assumptions
- You know about Visual Studio Code (VS Code)
- You’re familiar with extensions in VS Code and have used some but haven’t built one before
- You know at least a little of TypeScript/JavaScript and Node.js
- You have the following installed:
- Node.js
- npm (or yarn)
- Yeoman:
npm i -g yo - VS Code Yeoman Generator:
npm i -g generator-code
Format of this Post
The format of this post is as follows: you’ll be presented with a question that is assumed to be on your mind and provided some answers and supporting details for that question.
What kind of extensions can I build?
You can build whatever your heart desires to build. There are a few main “types” of extensions you can build though which give you a better idea of where to start. Let’s break them down by what you might want to do.
1. Customize VS Code’s Look and Feel
What does this mean? Color themes and Icon Themes. A Color theme is actually a great place to start for your first extension. Let’s first break them down a bit more for better understanding.
-
Color Theme
This type of extension customizes the visual look of VS Code. You can change the colors of sooo many different aspects within the user interface (UI). this can be quite overwhelming. Using an existing theme you like but want to tweak is a great way to get started with creating your own theme that you’ll actually use. Doing so will give you a lot of example color changes that you can tweak and see the result quickly. However we’ll see how easy it is to get started from scratch soon.
My favorite theme at the time of writing this post is Night Owl by Sarah Drasner
 Cycling through color themes in VS Code that have been installed
-
Icon Theme
This type of extension customizes the graphics associated to file/folder types. A great example of this is the Material Icon Theme (which is what I use).
 Cycling through icon themes in VS Code that have been installed
2. Extend Existing Functionality
What does this mean? It means there is some existing capability/feature in VS Code but you wish it had something more to it. A simple example of this is creating new keymaps that make it easier for someone who’s used to certain keyboard shortcuts found in another editor. A similar example is an extension that provides code snippets to generate common code that is reused in Node.js applications.
Here are some simple examples:
- Keymap Extension Sublime Text
- Code Snippet Extension Vue.js Snippets
More complex examples:
- Enhancing source control with Git: GitLens
- Improving code readability: Bracket Pair Colorizer
3. Add New Functionality
What does this mean? It means VS Code doesn’t provide some sort of functionality that you’re looking to use. In that case we build out an extension that adds that functionality.
Examples:
-
Problem: No native support for connecting with Chrome’s debugger for front end web development.
Solution: Debugger for Chrome Extension
-
Problem: No native support for smart completions (Intellisense) when writing Python code
Solution: Python Extension
-
Problem: No native support for integrating Twitch chat messages to control highlighting lines of code
Solution: Line Highlighter for Twitch Extension
4. Aggregate Other Extensions into One Place
What does this mean? You bring many extensions together under one pack that help fulfill a specific focus/category of actions. Essentially there are many extensions out there that alone are great for the type of development you may be doing but you may not be aware of them all. Someone can gather them together to make them easier to find and install at once.
An example of this is the Angular Essentials extension pack that packs a bunch of Angular related extensions into one place. Check out the source code on GitHub to see what’s involved in creating one.
These types of extensions are driven by their
package.jsonfile to define the other extensions to be included in the pack. See the example from Angular Essentials’ package.json
How do I build an extension?
One of the simplest extensions you can start with is a Color Theme extension. Let’s step through building one of those now.
Building a Color Theme Extension
Let’s build a color theme extension from scratch just to get a feel for creating our first extension. We’re going to use the VS Code Yeoman Generator so make sure you executed the following command in your terminal/command prompt:
npm i -g generator-codeThis installs the Yeoman CLI tool and the VS Code templating/scaffolding generator as an option within it
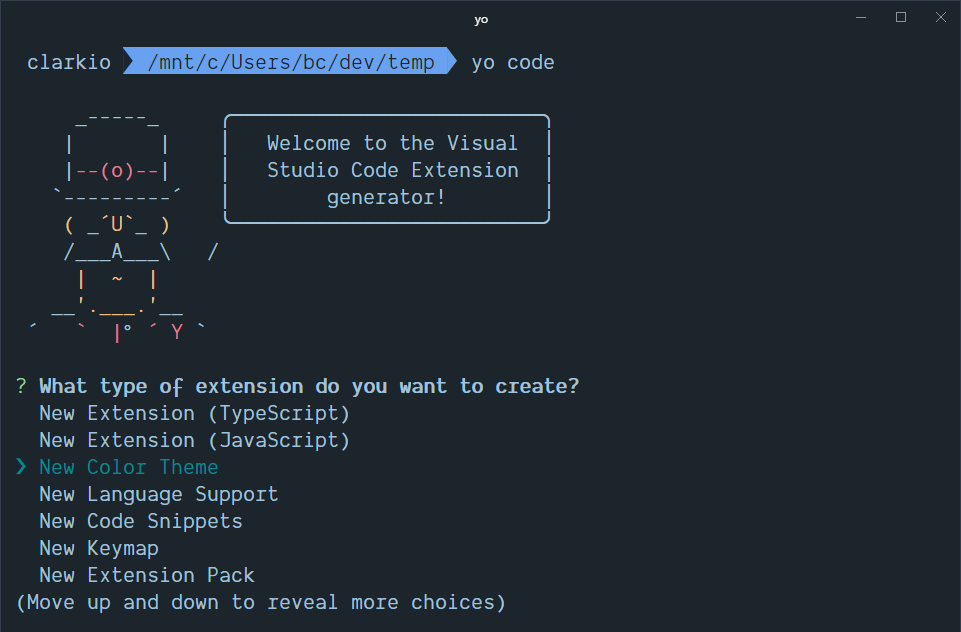
Once you’ve installed that go to your main folder/directory that you’d like to use for development (example: cd /my/dev/folder) and run yo code to get started:
function test(a, b) {
const sum = a + b;
return sum;
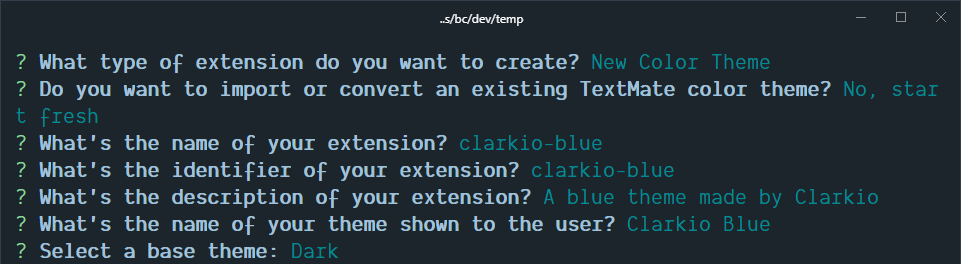
}You’ll be prompted to choose the type of extension you want to create. Use your keyboard arrow keys to move to the “New Color Theme” option and press your Enter key.
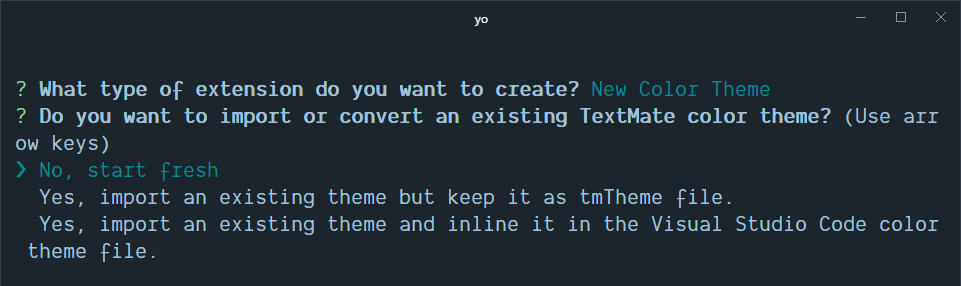
Next, you’ll be prompted with an option to import or convert an existing color theme. Choose the option “No, start fresh”
From here, the prompt will ask you to provide details about the extension.
name: this determines the folder it will create in your current directory.identifier: this is what will be used in the extension marketplace for others to find it so make sure this is unique if you plan to publish this later (I generally use my username handle followed by the name of the extension/theme).description: longer form text to describe your extension- name of your theme: this is the text users will see as an option when switching themes within VS Code (after it’s been installed)
base theme: this give you a starting point for creating your theme instead of trying to figure out how to create one completely from scratch. Choose whichever option best suites the type of color theme you want to create: Dark, Light, High Contrast
When you’ve finished entering all the options for your color theme press the Enter key for the last prompt to start generatoring everything. You’ll see some progress in the terminal/command prompt which shows the files and folders it is generating for you.
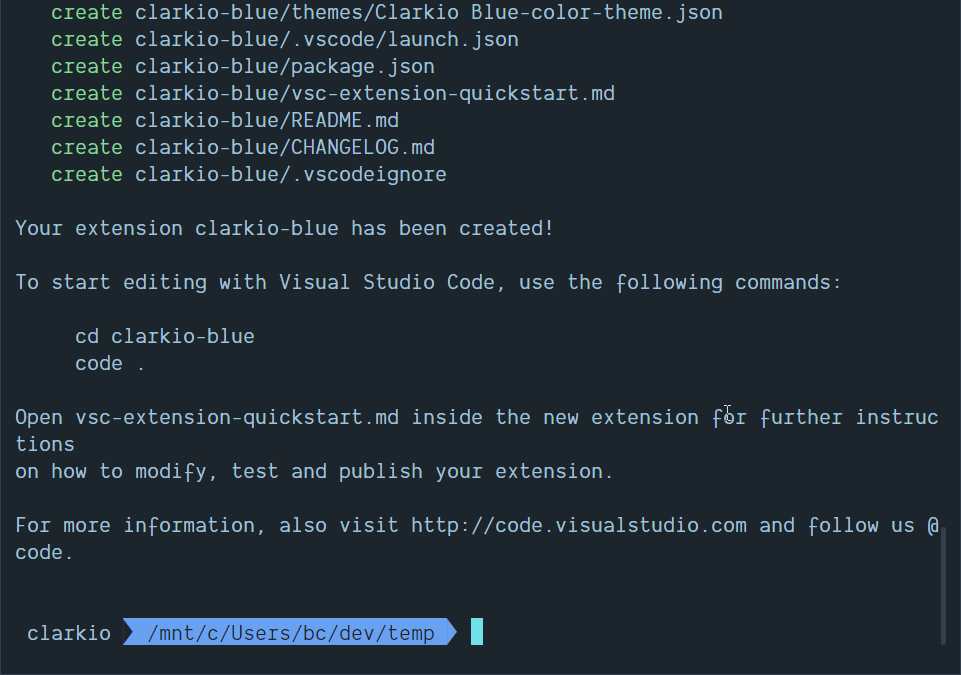
When it’s done you should see a message that says the following: “To start editing with Visual Studio Code, use the following commands:” Run the commands shown below it and you’ll see VS Code open the folder for your color theme extension.
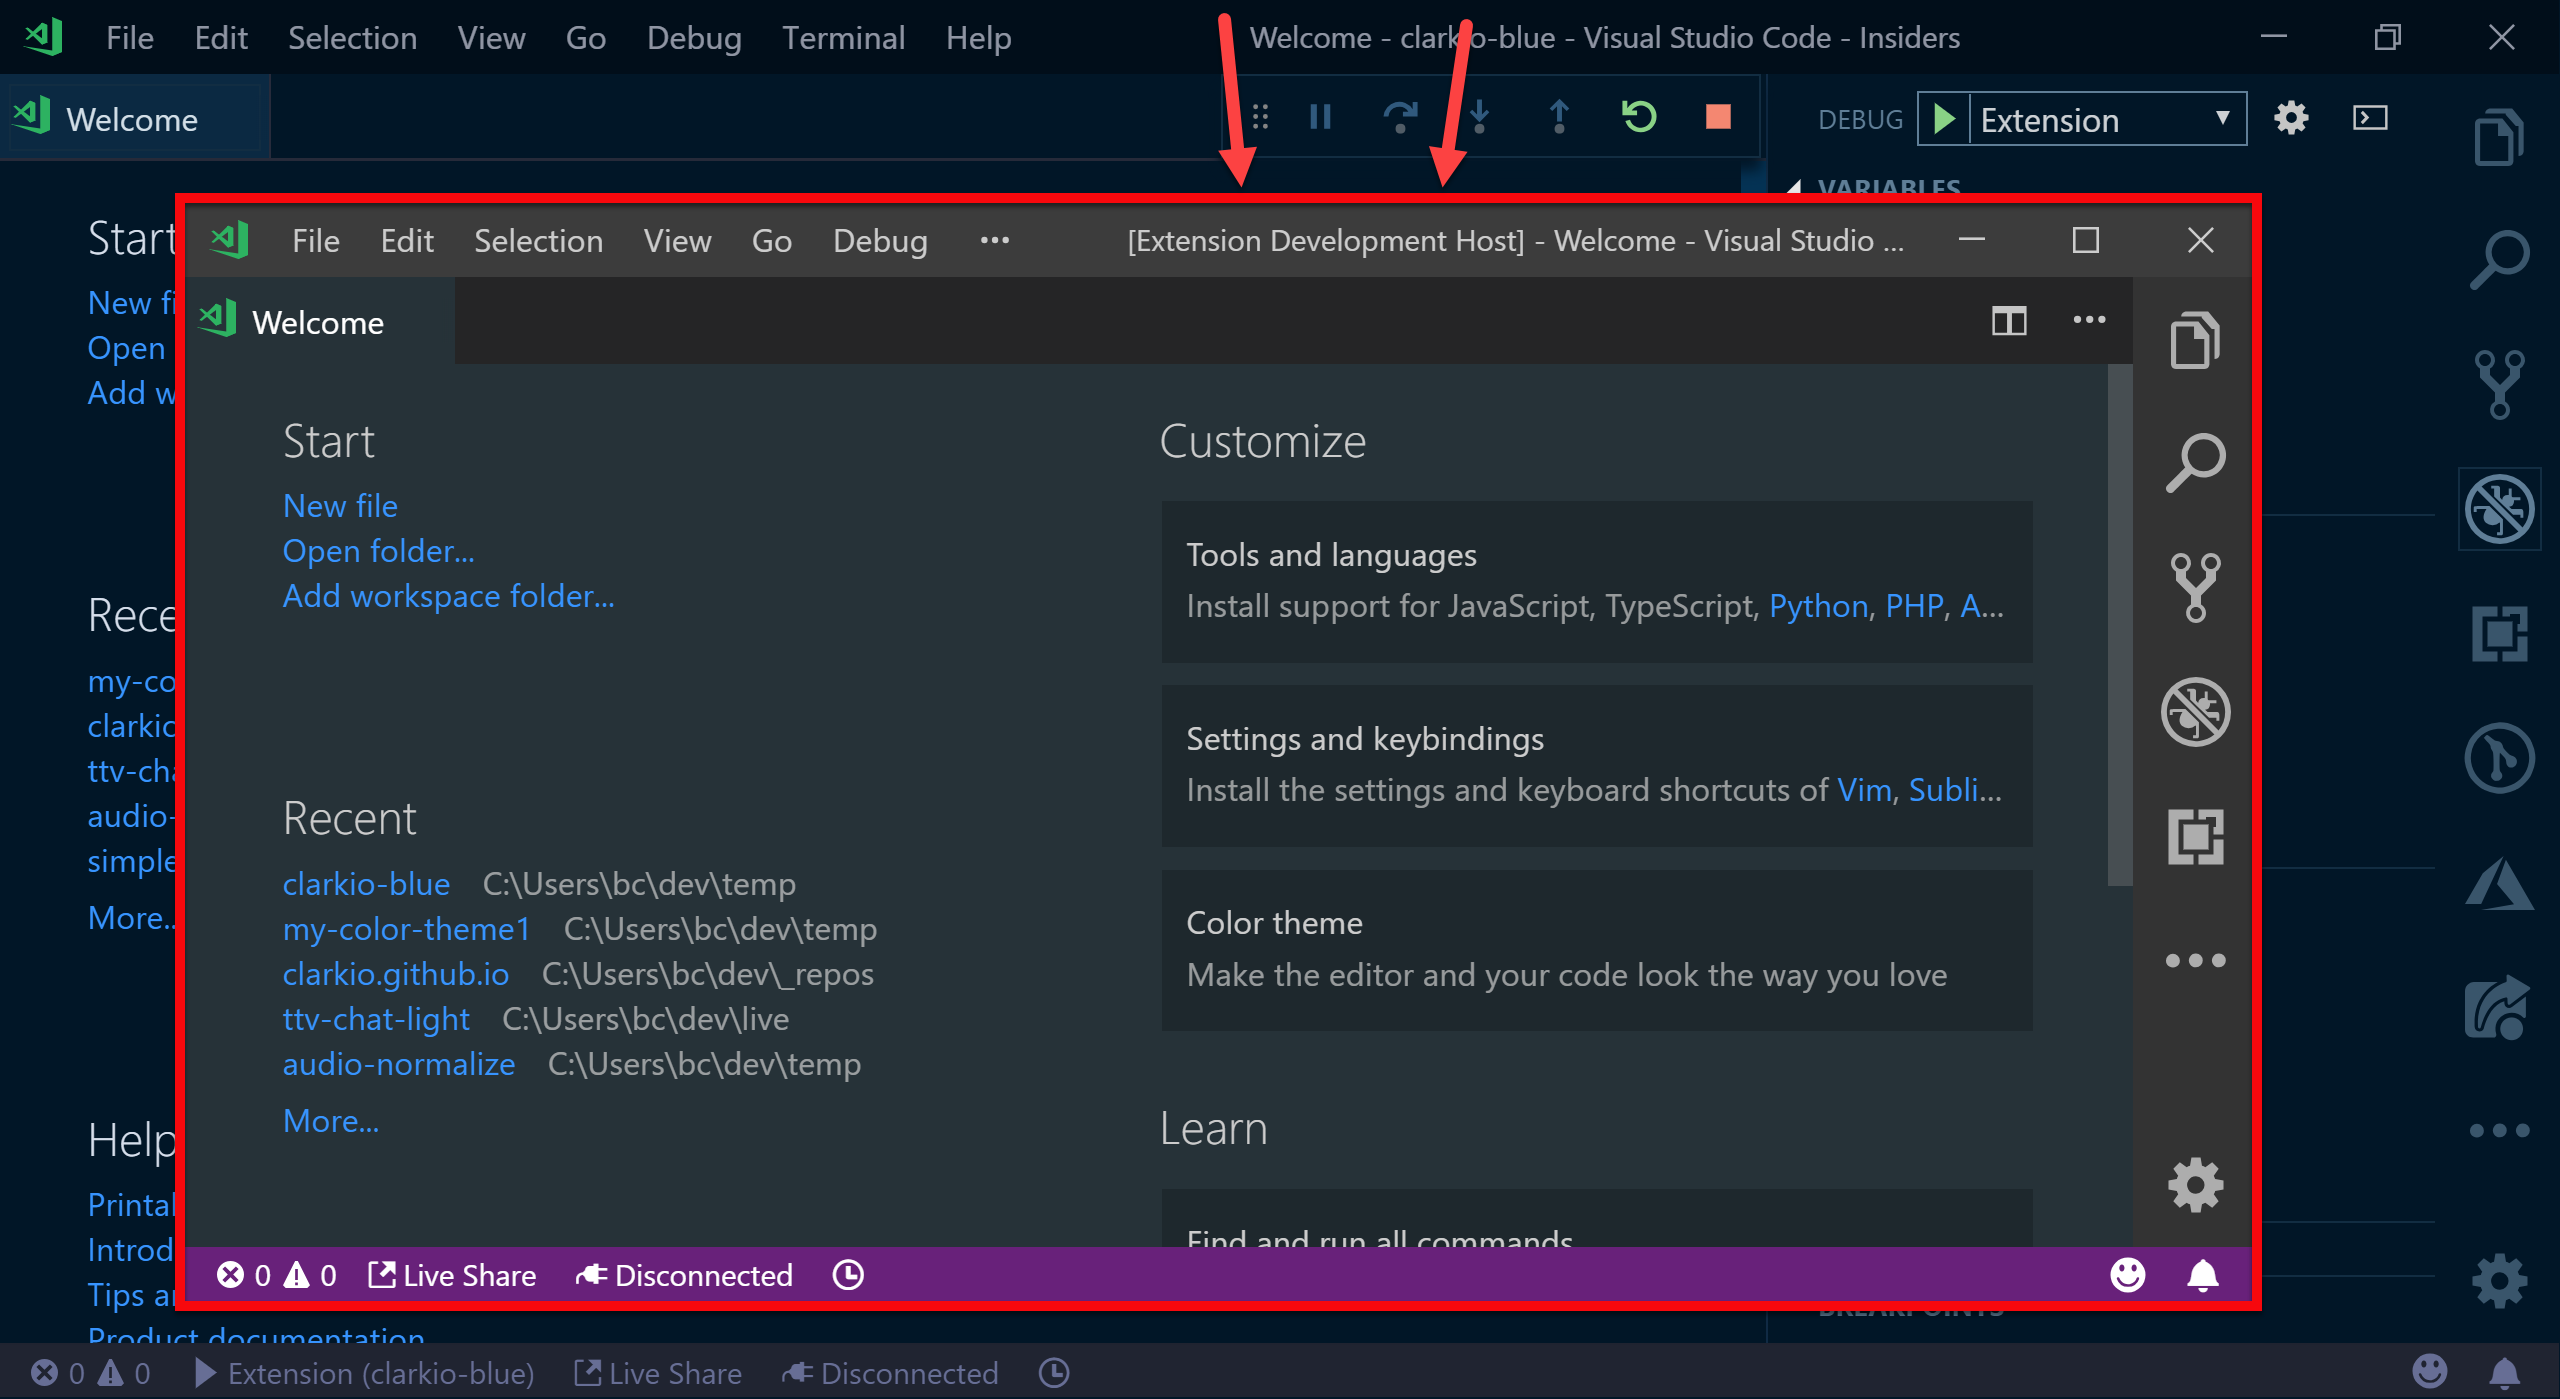
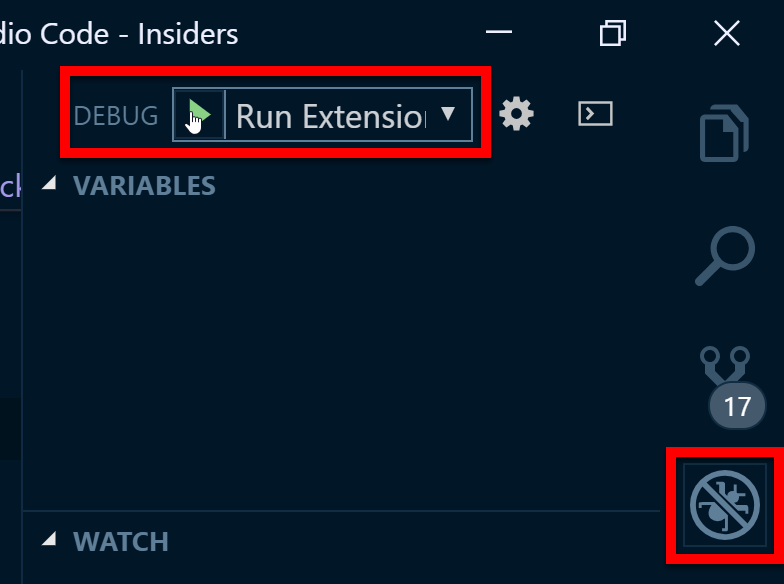
Open up the debugger view in VS Code using the keyboard shortcut CTRL/CMD + SHIFT + D (or click on the icon with a bug in it). Click on the green “play” button (as seen in the screenshot below) to start debugging/running your color theme extension.
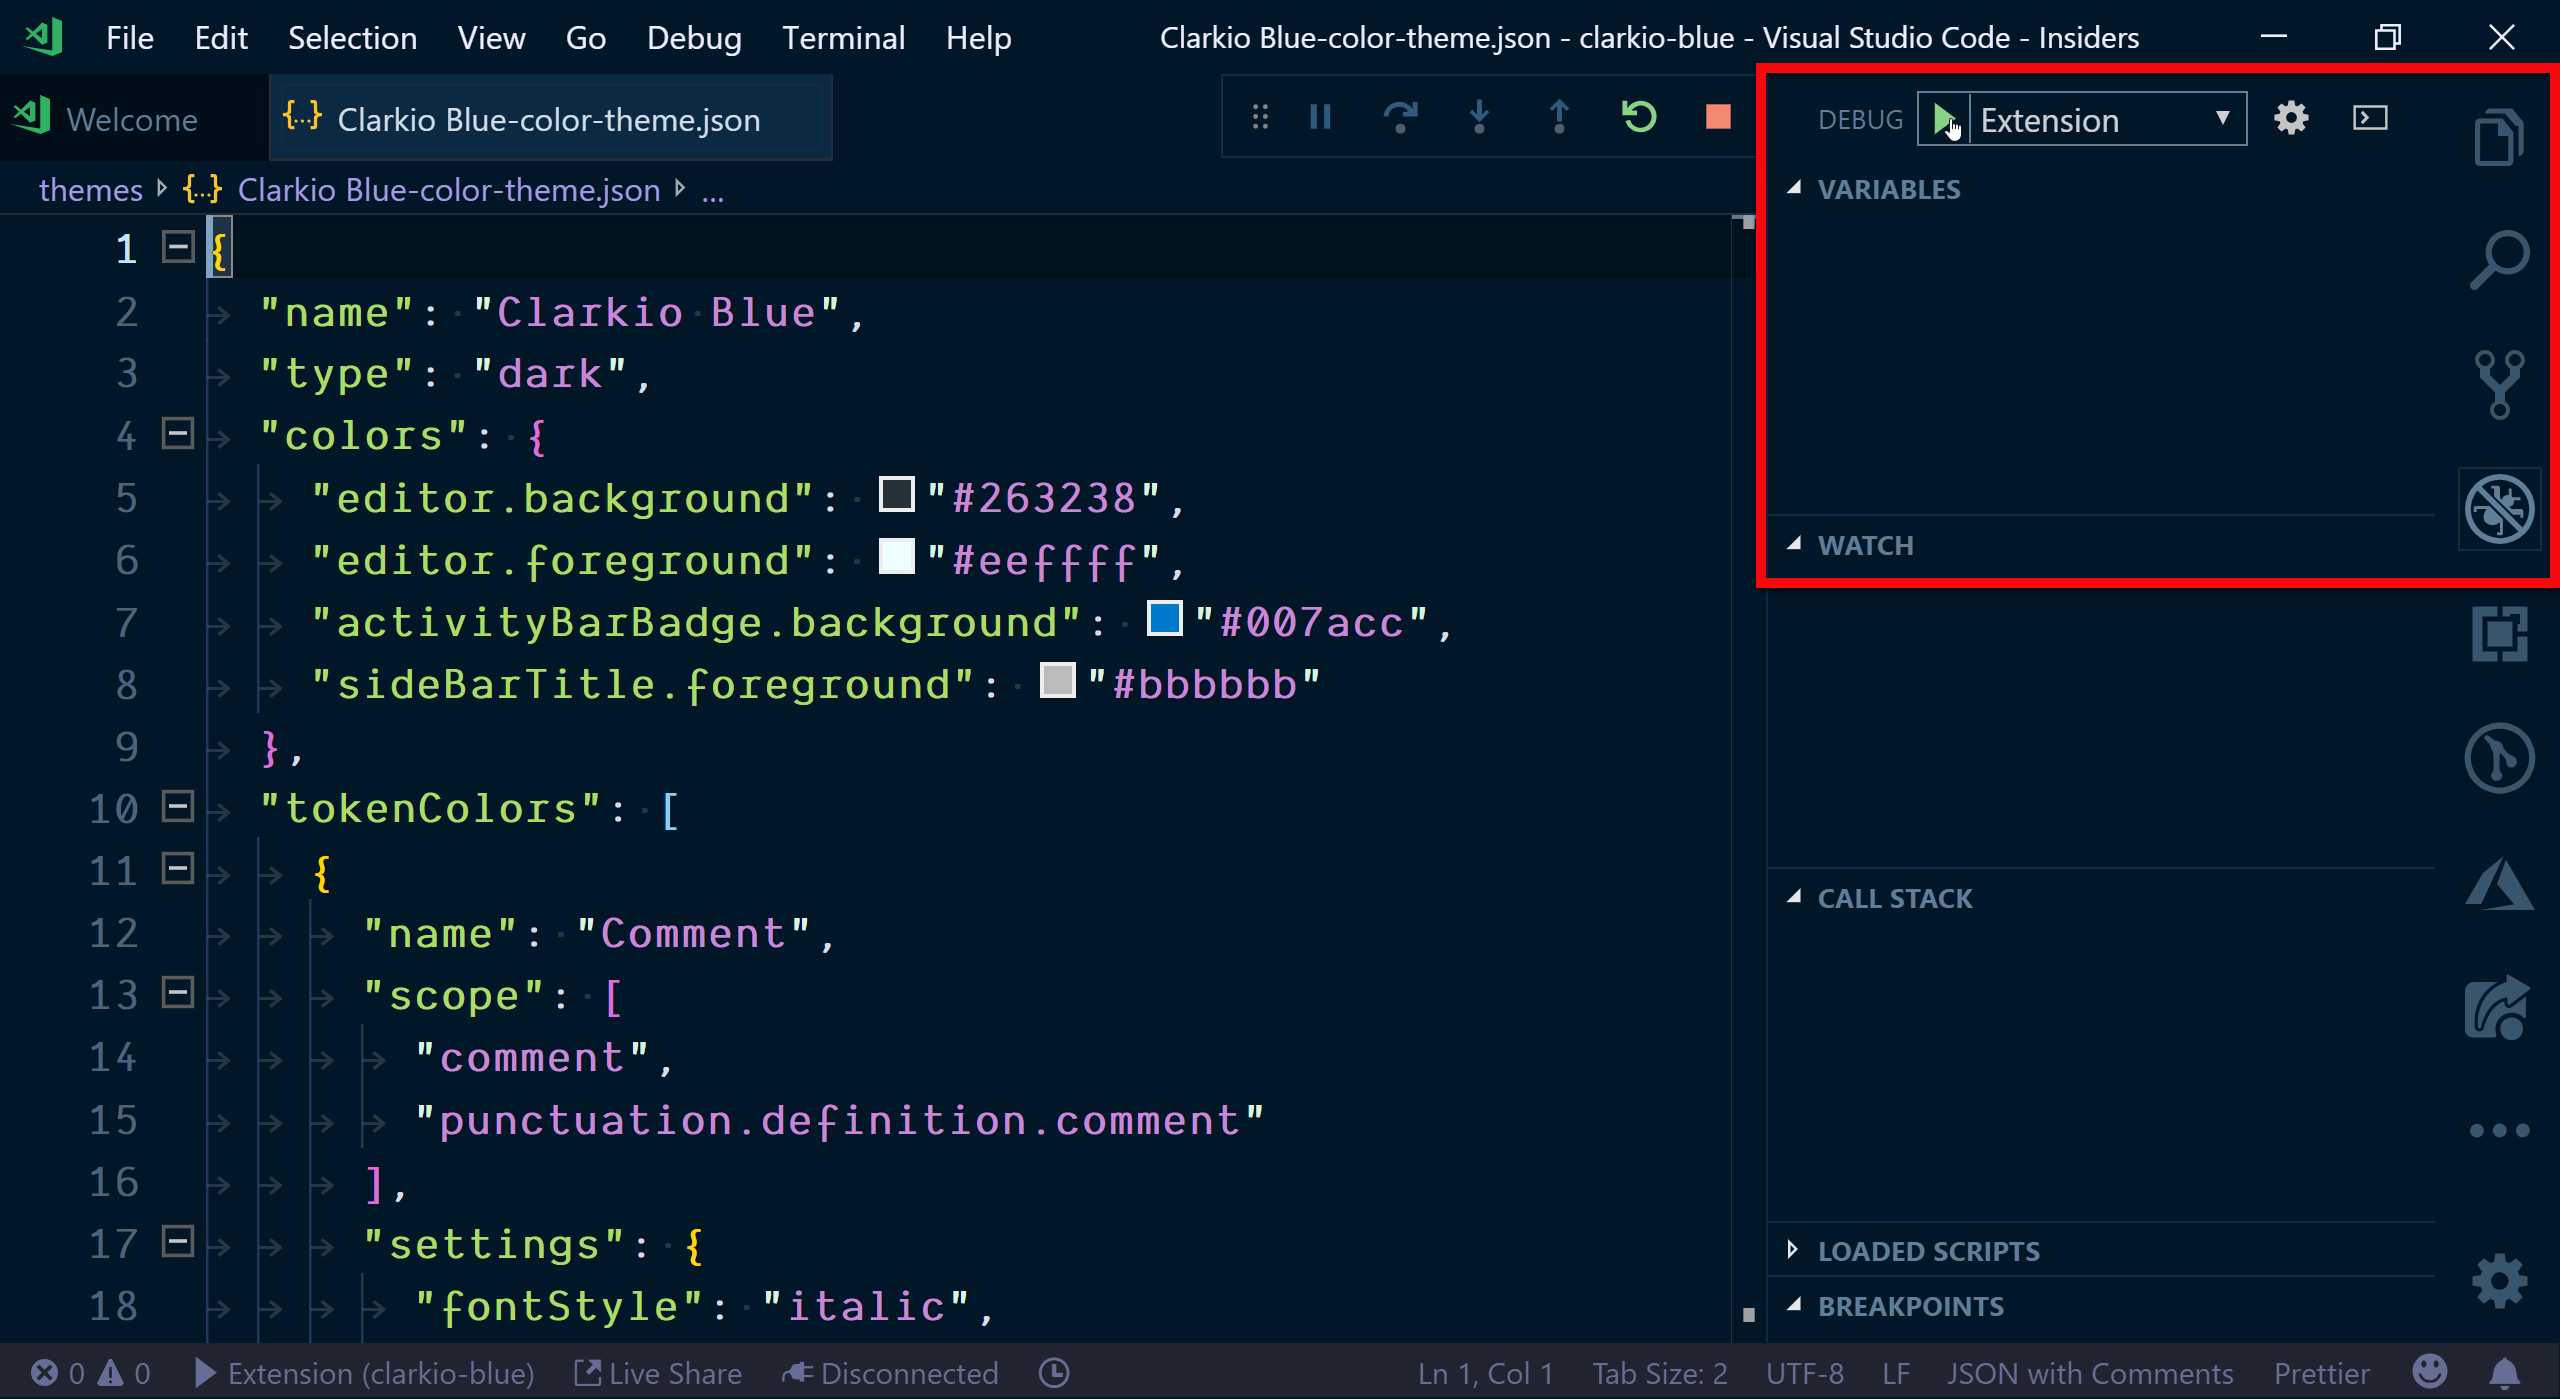
Once running you’ll see a new instance of VS Code open up with a title of “Extension Development Host”. This is a separate instance of VS Code running with your extension loaded into it. Back in a previous step when generating this color theme extensions in the terminal/command prompt I chose the “Dark” option for my base theme so I see this as the default color in the Extension Development Host instance of VS Code. You may see different colors based on the base theme you chose during that step. Let’s test out changing a color to the theme.
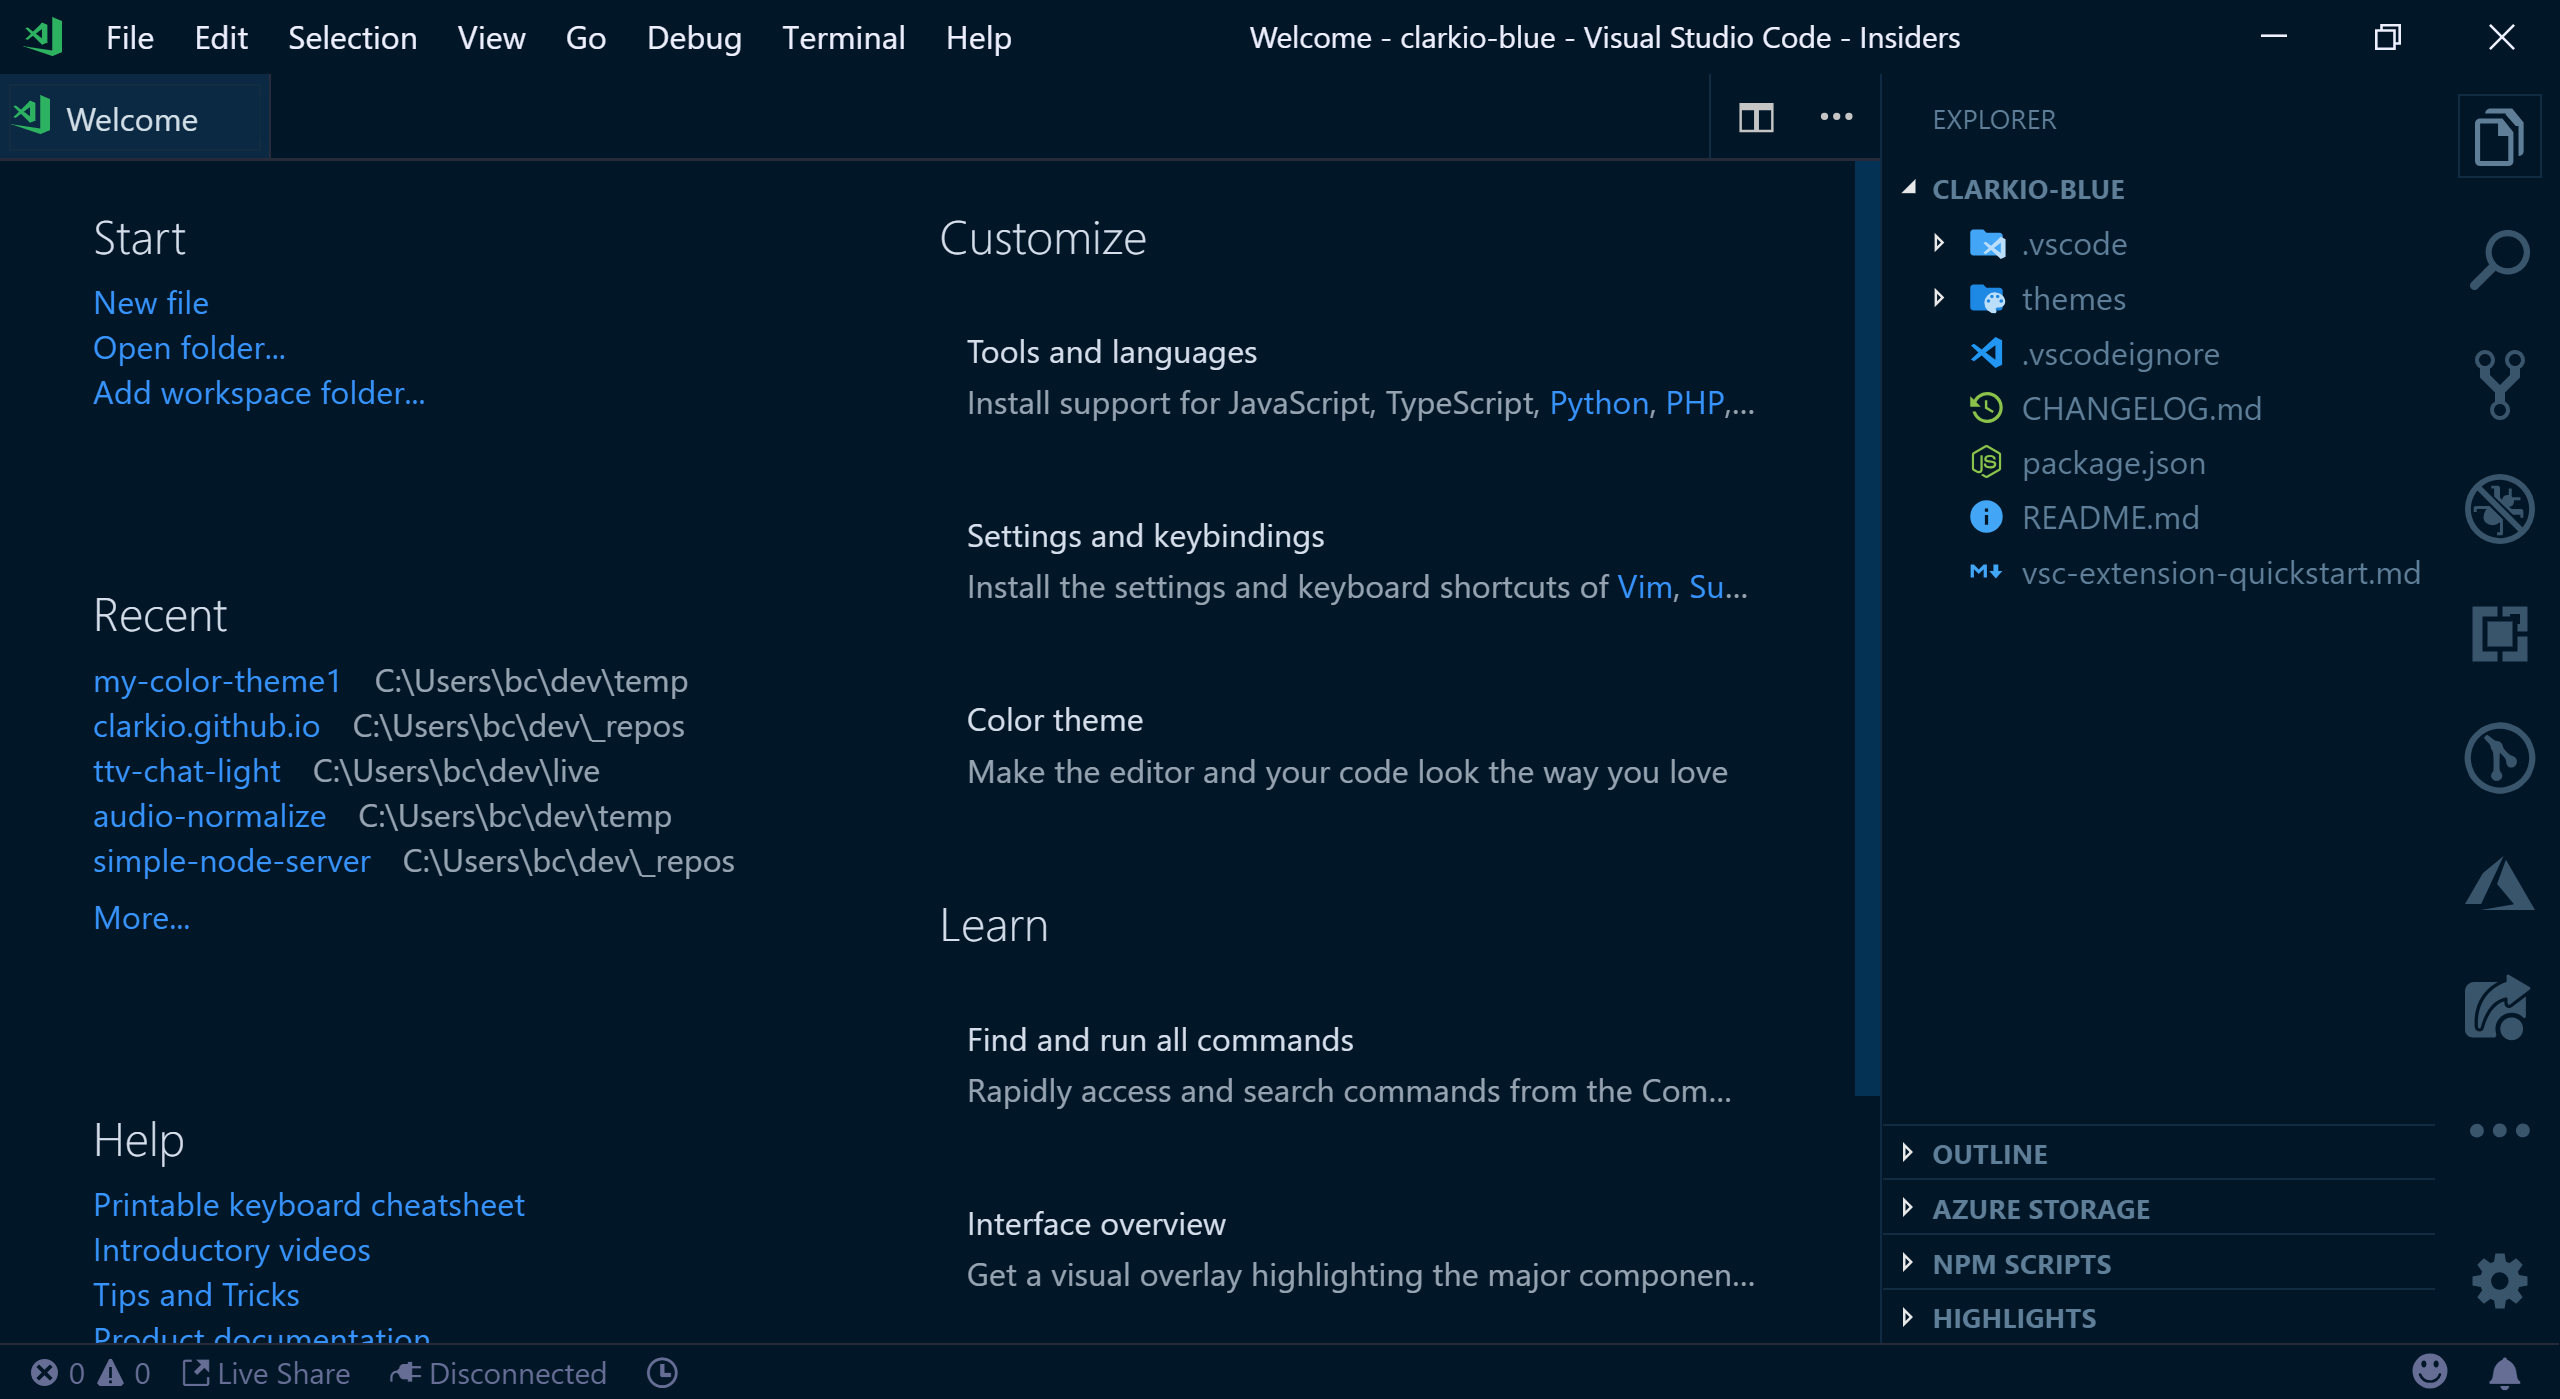
Go back to your other instance of VS Code that has the extension folder opened. Expand the “themes” folder and double click on the .json file to open/view the contents.

Now find the editor.background key in the JSON file under the colors key. Hover your mouse over the string value to bring up the color picker view in VS Code. Carefully move your mouse into the color picker pop up view and change the color to something different. You’ll see the string value change.
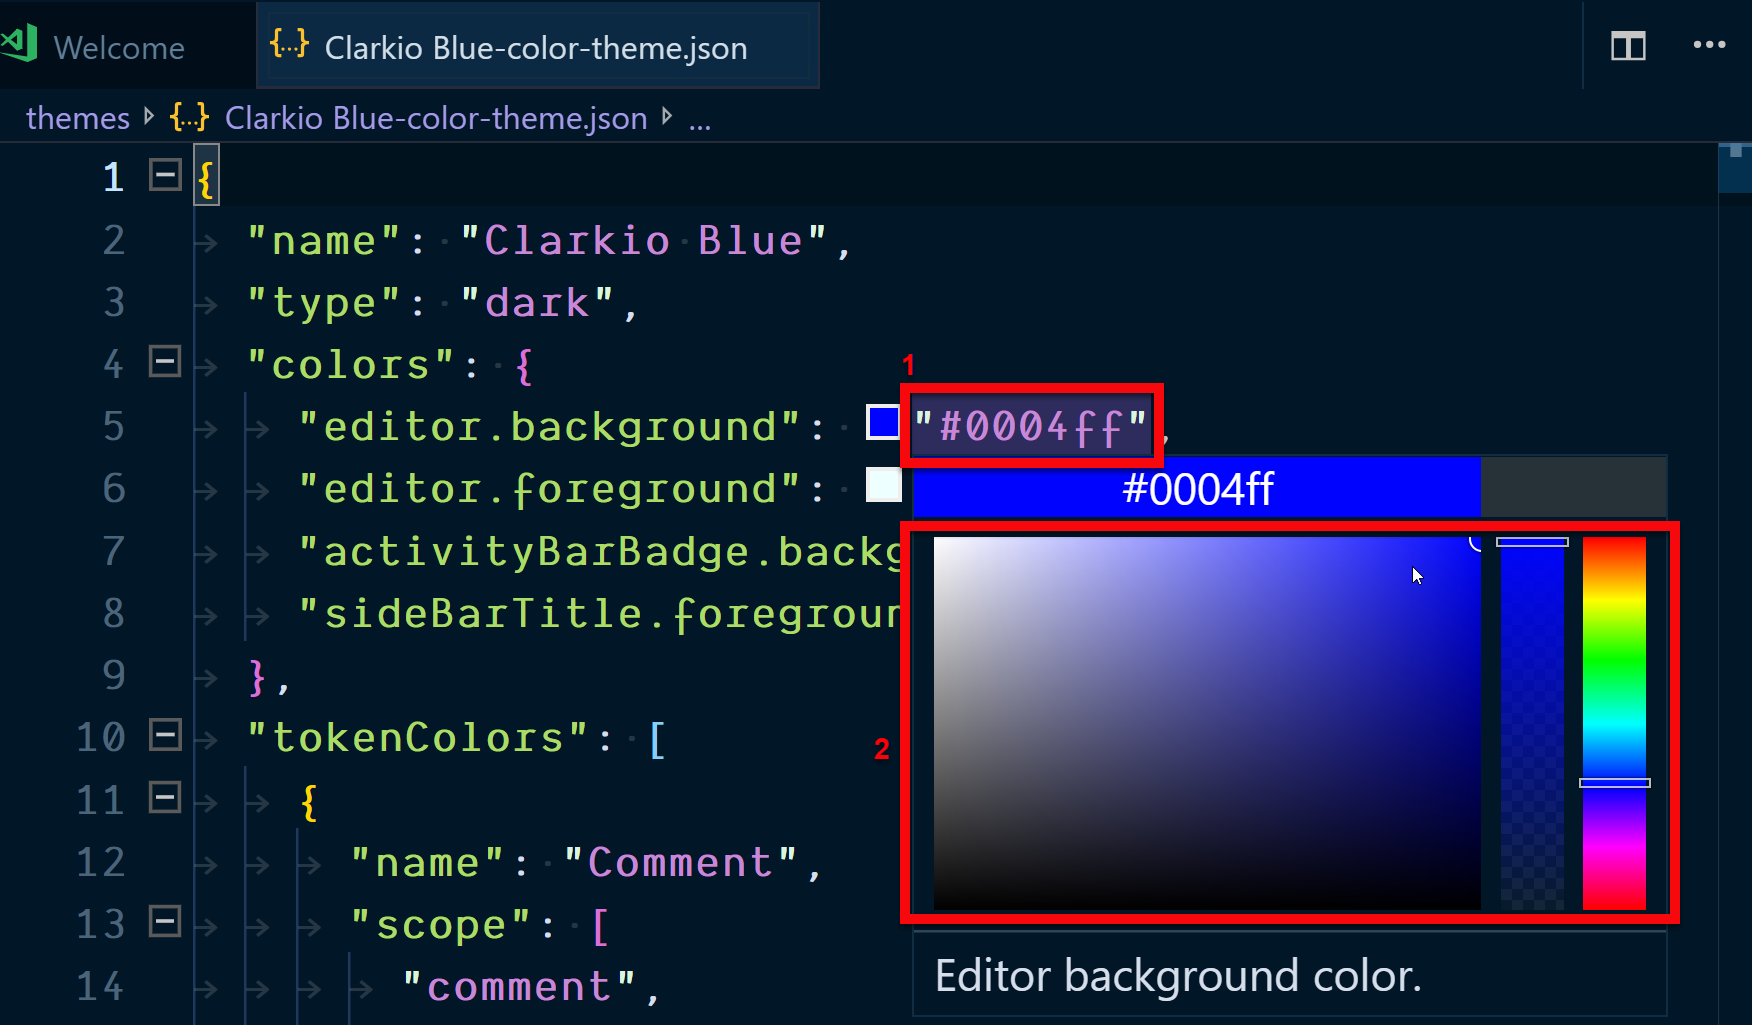
Once you save your changes you’ll see the “Extension Development Host” of VS Code will automatically update and display the color change.

You’ve done it! Congratulations on creating your first extension for Visual Studio Code! Feel free to continue tweaking color options in the .json file to further customize your color theme extension.
Building Something More
Creating a color theme extension is great and all but it doesn’t dive deep into enhancing or creating features within VS Code. Let’s walk through creating an extension that results in creating a file that lists all the extensions we’re using in VS Code.
Go to your main folder/directory that you’d like to use for development (example: cd /my/dev/folder) and run the following command to get started:
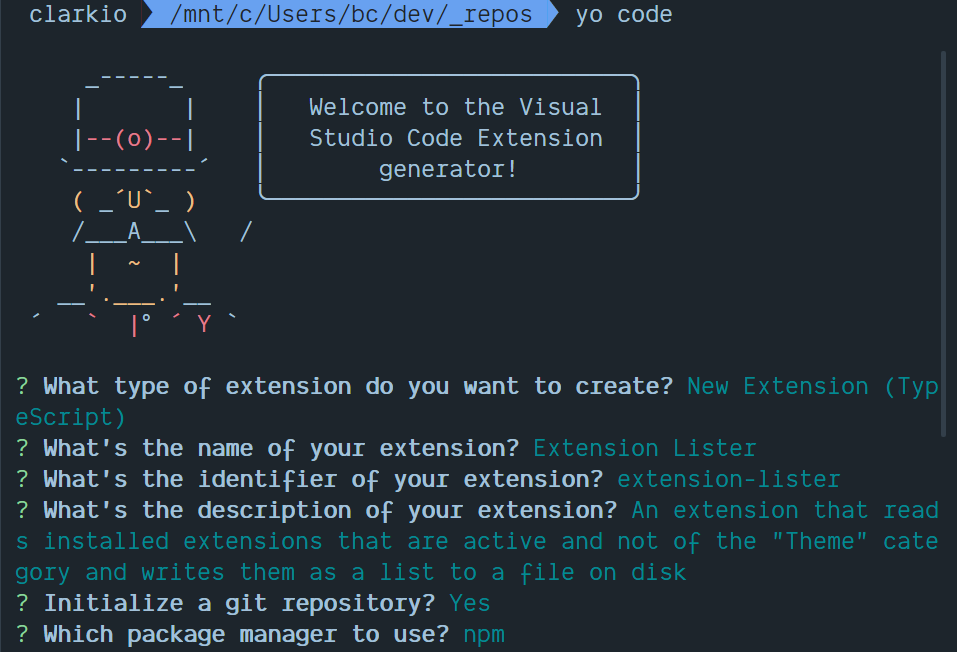
yo codeYou’ll be prompted to choose the type of extension you want to create. Use your keyboard arrow keys to move to the “New Extension (TypeScript)” option and press your Enter key.

From here, the prompt will ask you to provide details about the extension.
name: this determines the folder it will create in your current directory.identifier: this is what will be used in the extension marketplace for others to find it so make sure this is unique if you plan to publish it later (I generally use my username handle followed by the name of the extension/theme).description: longer form text to describe your extension- name of your theme: this is the text users will see as an option when switching themes within VS Code (after it’s been installed)
git repository: this give you the option to initialize the project as a new git repository or notpackage manager: choose whichever you prefer between npm and yarn
Change to the directory for the newly generated extension and open it up in VS Code

VS Code extensions leverage package.json as their manifest and extend it with some further options beyond the conventional options. We won’t go into detail for all of them but we’ll need to change a few for the purposes of this extension.
-
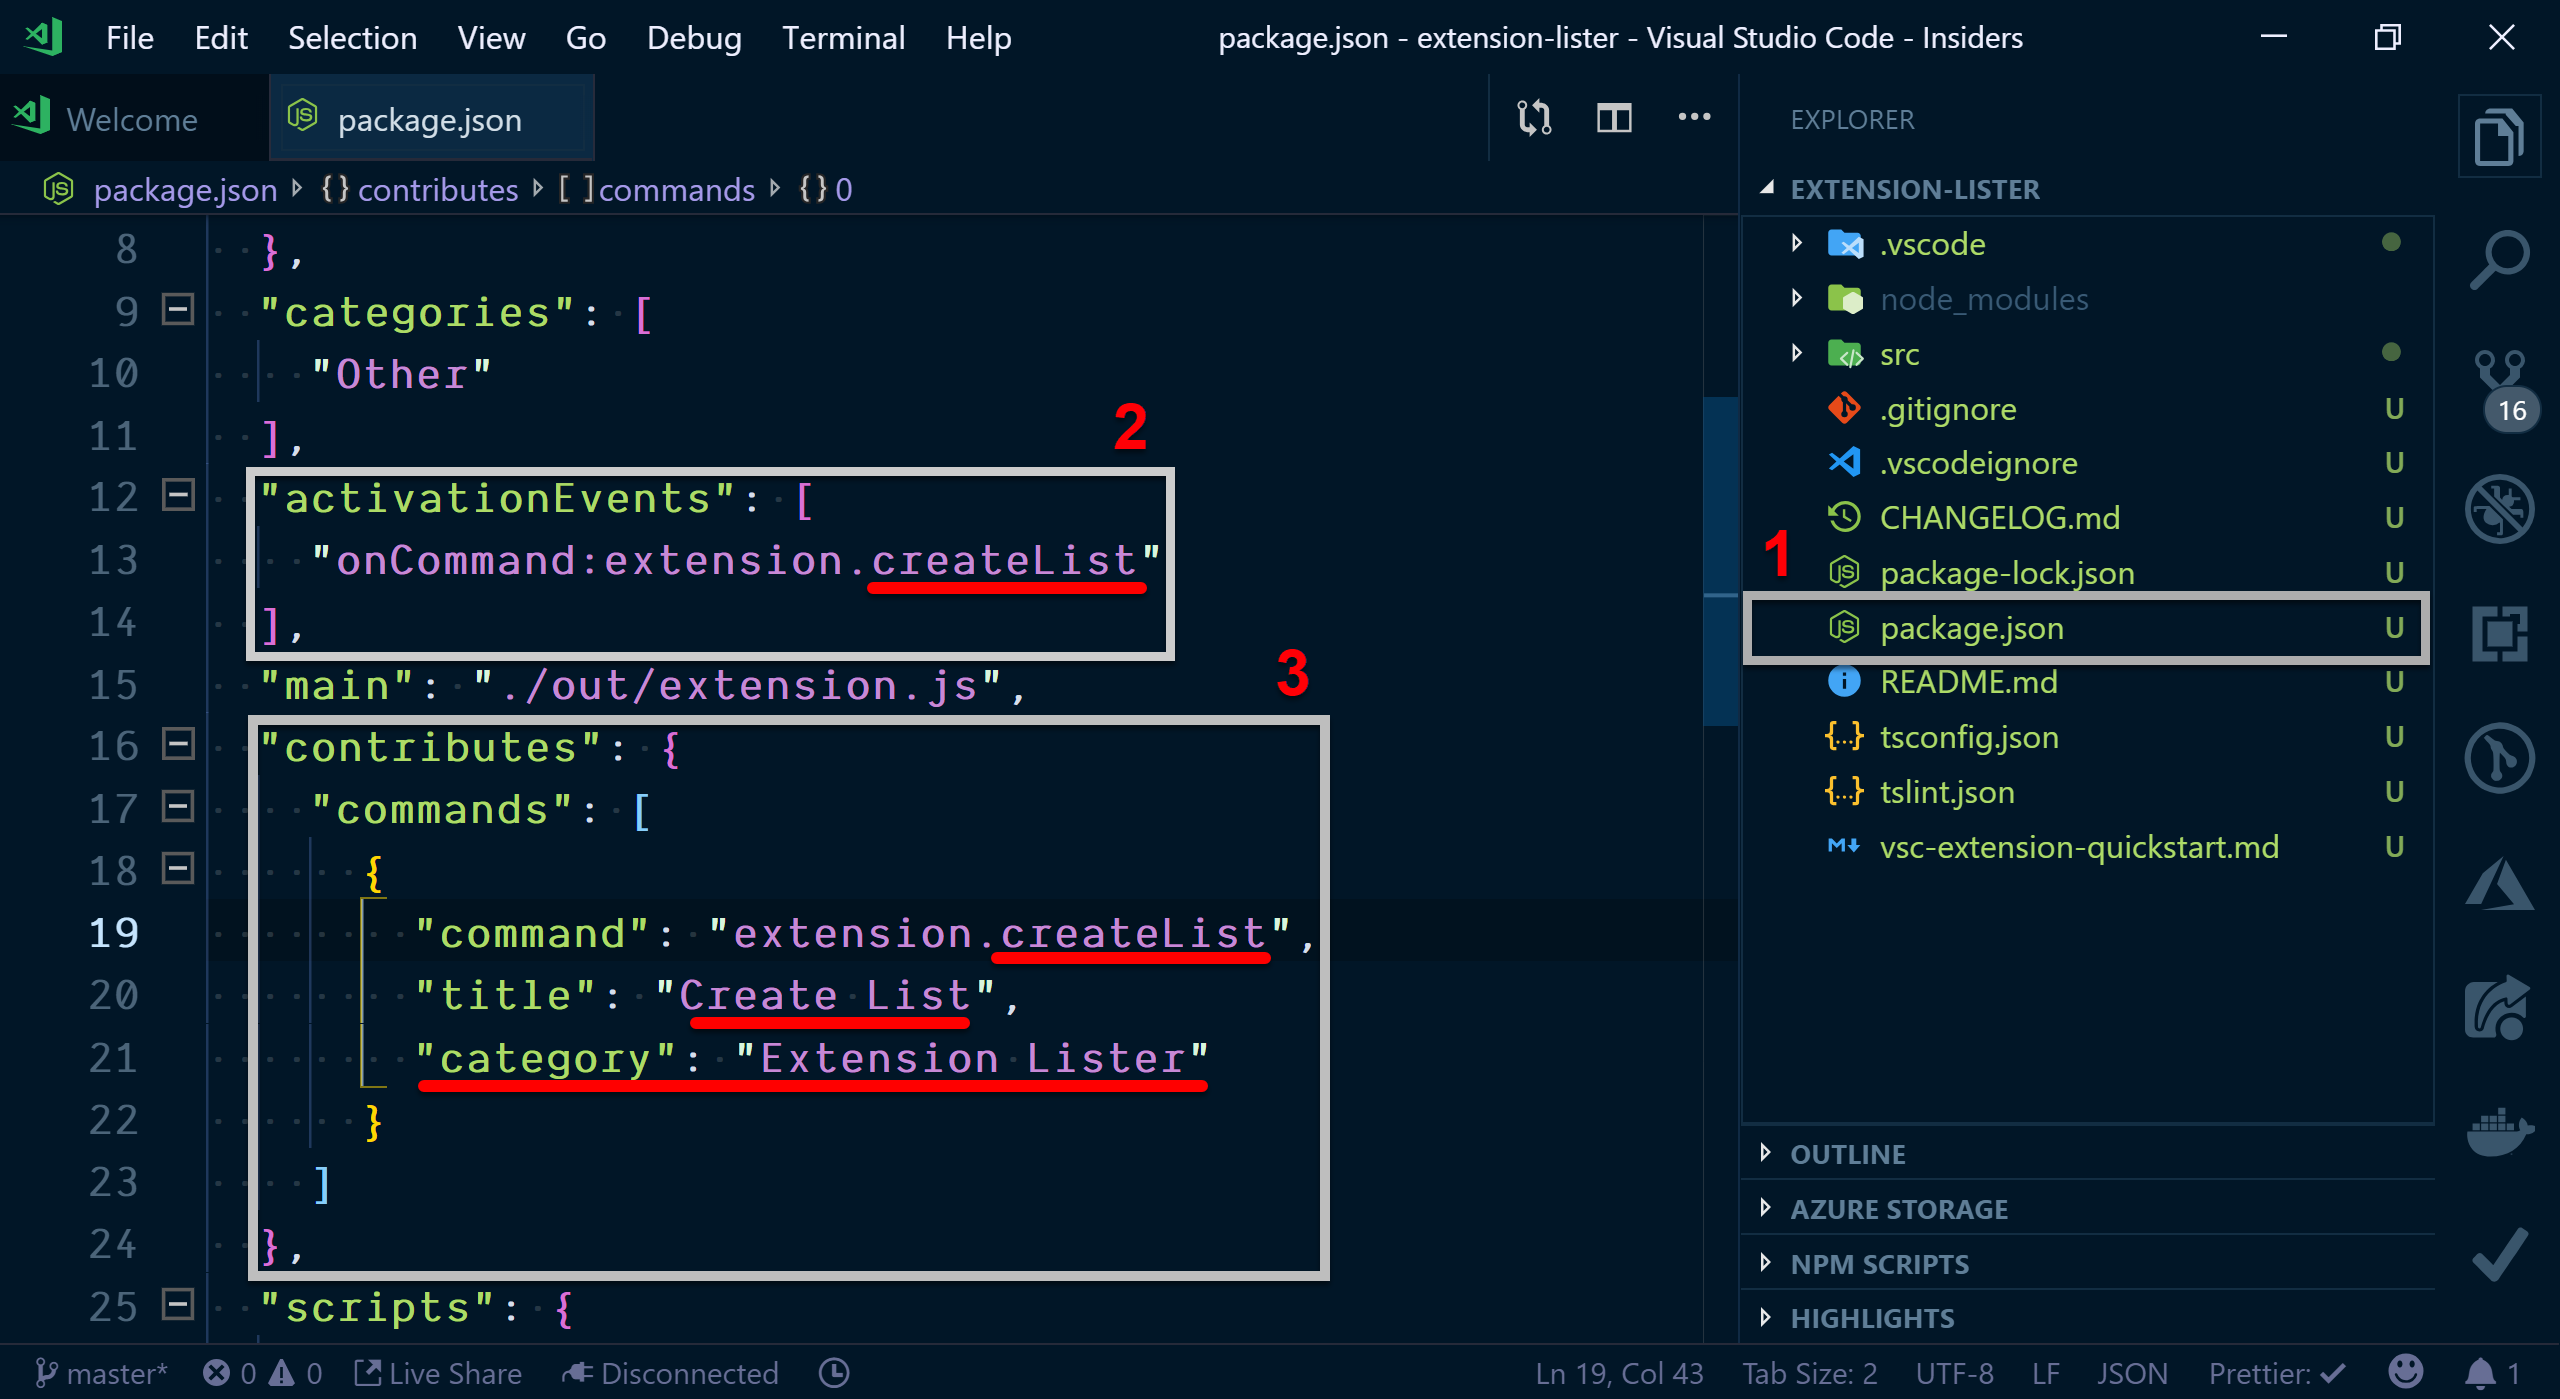
Open up the
package.jsonfile and find theactivationEventskey. This defines what action will activate your extension. At the moment it’s defined to activate your extension when the command “helloWorld” is triggered. You’ll see this as string value"onCommand:extension.helloWorld". To make sure we keep things consistent with the intent of this new extension replacehelloWorldwithcreateListas that will be the name of the command we’ll create. -
Shortly below the
activationEventskey you’ll find another keycontributes. This defines the many ways your extension can “contribute” to VS Code. At the moment it has one option defined and that is via thecommandsoption. This is an array defining various commands the extension will make available to VS Code via the command palette. You should see one command defined asextension.helloWorld. The “extension” part of that command acts as a namespace when wiring up the command within VS Code and the “helloWorld” part creates a unique name for the command within your extension. We need to make sure this gets changed to match what we updated in theactivationEventsso replacehelloWorldhere withcreateList. -
The
titlekey within the command definition provides the text that will be shown to users within the command palette. Change the value of this key to beCreate List. The last thing we’ll change in this file is add another key belowtitleso put a comma at the end of thetitlevalue and press your “Enter” key for a new line. Add a key"category"(intellisense should pop up to help here too) and give it a value"Extension Lister". Thiscategoryhelps group commands visually such that they show up as the following in the command palette<Extension Category>: <Command Title>(Example: “Extension Listener: Create List”)
Let’s get into building out the functionality for this extension. Within the src folder you’ll see a file extension.ts. This is the main file that’s used to load up your extension and corresponding functionality. Take a moment to read the comments within the code that helps describe some of the parts of code that were generated for you… Seriously go read it and come back.
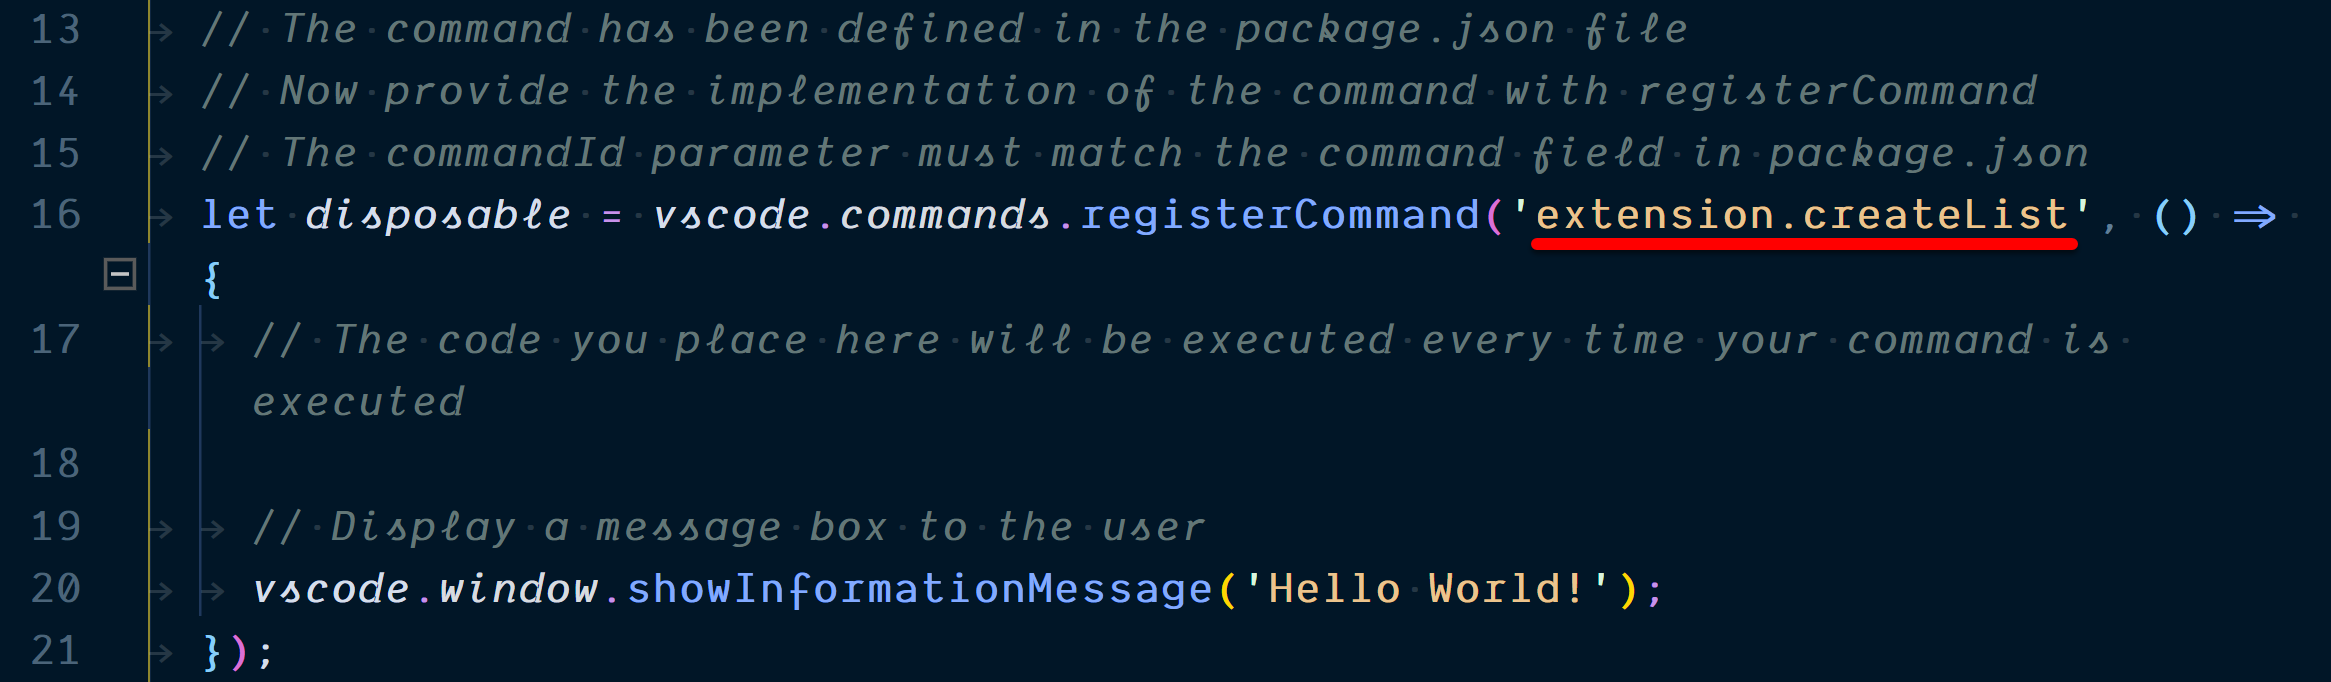
Now that you’re a bit more familiar with the code let’s get our first command set up. We first need to update our command code to match the changes we made in the package.json. Find the code registerCommand('extension.helloWorld' and replace helloWorld with createList.
Ok the command is wired up correctly and we’re ready to start gathering the list of extensions. The VS Code API provides a namespace extensions which contains a list of all extensions available in the instance under the all array. We access the API via the import * as vscode from 'vscode'; statement. Since that was already done within the registerCommand (on line 17) let’s grabbed the array and assign it to a constant. Replace the line of code vscode.window.showInformationMessage('Hello World!'); (and the comment above it) with the following code:
const activeExtensions = vscode.extensions.all;If you run and debug the extension with a breakpoint on this line you’ll notice the array contains literally all extensions installed and available for the instance of VS Code the extension is running within. Feel free to try this yourself now but it is not required. This is a good start but if you inspect collection of extensions you’ll notice it includes extensions that are built-in for VS Code, ones that are not currently active and extensions that are themes.
Being that we’re getting extensions outside the scope of what we want to include in the list (active, non-theme type, extensions) we need to filter some of these results first. Add the following array method, filter, to capture the extensions within scope.
const activeExtensions = vscode.extensions.all.filter(
  (extension: vscode.Extension<any>) => {
    return (
      extension.isActive && // make sure it is active
      !extension.packageJSON.isBuiltin && // don't include built in
      !extension.packageJSON.categories.some(
        // don't include themes
        (category: string) => category.toLocaleLowerCase() === 'themes'
      )
    );
  }
);
Next we want to format the content of what will be written to the file to be as follows: <extension name>: <extension marketplace URL>. This will make it easy to share and allow others to quickly install the extensions. To do this let’s iterate over the array of extensions to create a string of the content to write to the file. Use the following code to accomplish that and add it after the activeExtensions array is defined and assigned:
let extensionListData = ''; // variable to hold the file contents as a string
activeExtensions.forEach((extension: vscode.Extension<any>) => {
  // thanks to TypeScript and the exposed Extension type from the VS Code API we get intellisense to see the properties of each extension.
  // In particular we want to read the display name property found in the `packageJSON` object and generate the URL using the extension ID property
  extensionListData += `${extension.packageJSON.displayName}: https://marketplace.visualstudio.com/items?itemName=${extension.id}\n`;
});
At this point we have the data we need and in a human readable format so we’re ready to ask the user where they want to save this file. For visual prompts and queues VS Code provides options via its window namespace. In particular we want the showSaveDialog function. There are some options/arguments we can provide to it such that it helps create a better user experience in this dialog. We know this will just be a plaintext file so we’ll provide a filter option that says to limit the file type to *.txt.
When the user has completed their actions in the save dialog the resulting URI (universal resource indicator) for the file will be returned to us in the promise .then() resolve function. We’ll need to make sure a URI was indeed provided first. If it wasn’t we can show an error dialog with vscode.window.showErrorMessage(). Once we know we at least have a value we can write to the file but let’s hold on that just for a moment. See the following code which accomplishes what we’ve discussed in this section:
vscode.window.showSaveDialog({ filters: { '*': ['txt'] } }).then((uri) => {
  if (!uri) {
    // This pops up an error notification dialog
    vscode.window.showErrorMessage(
      'You must select a file location to create the extension list'
    );
    return; // Don't proceed if we don't have a file URI to write to
  }
  // We'll add the code to write to a file here next...
});
We want to implement writing to a file on the Operating System’s file system, however, we shouldn’t pollute our main extension code with that code. Let’s create a separate file to handle writing a file to the file system. Open VS Code’s file explorer view by clicking on the icon or using the keyboard shortcut CTRL/CMD + SHIFT + E. Right-click on the src folder and choose “New File”
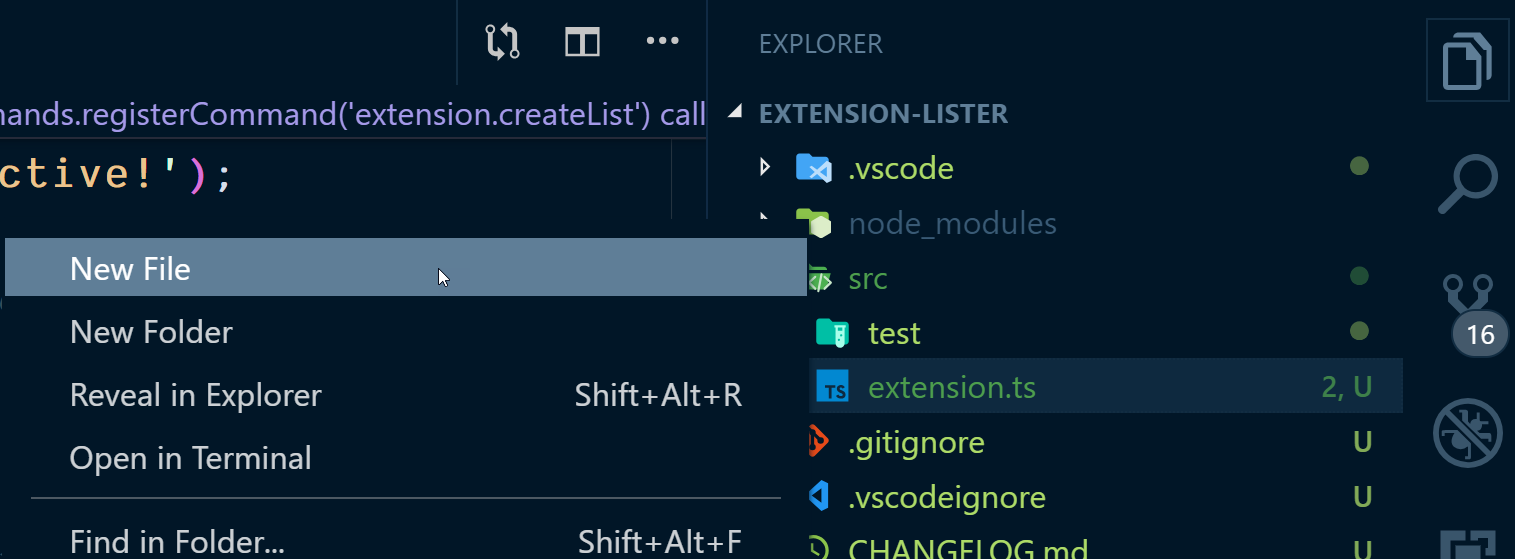
Give it the name file-manager and press enter to complete the file creation. VS Code should automatically open up that file but if not double-click on it. We won’t go through the following code as it’s not really pertinent to the creation of VS Code extensions but know that it’s handling writing the contents to a file. Feel free to review the code if you’d like. Add this to the file-manager.ts file and save:
import { writeFile } from 'fs'; // leverage the Node.js file system module's writeFile function

export async function writeExtensionListFile(uri: string, data: any) {
  await writeFile(uri, data, (err: any) => {
    if (err) {
      throw new Error(err);
    }
    return true;
  });
}
We can now import the writeExtensionListFile() function from the file-manager.ts file we created to handle the last step. Open up the extension.ts file again and add an import statement to the top of it after the vscode import (found on line 3):
import { writeExtensionListFile } from './file-manager';Sweet, let’s use it. Go down to where we have the showSaveDialog and after the part that’s checking for a uri value add the following code:
// Provide the full path on the file system for the file to write to and the contents we want to write to that file
writeExtensionListFile(uri.fsPath, extensionListData)
  .then(() => {
    // if the file was created successfully show an alert notification
    vscode.window.showInformationMessage(
      'Extension list was successfully created'
    );
  })
  .catch((error: any) => {
    // if the file failed to be created show an error notification
    vscode.window.showErrorMessage(
      'There was an issue creating the extension list'
    );
    console.error(error);
  });
What does this code do? It’s calling the function writeExtensionListFile and passing in the full file system path value (a property on the uri object) and the contents we want to be written to it. If that goes through successfully we let the user know through the vscode.window.showInformationMessage() function otherwise we show an error message with the vscode.window.showErrorMessage() function.
In case something isn’t working correctly for you use the following GitHub repository as a reference for the completed code: VS Code Extension Lister
How about we give it a run and test it out? Press F5 to start debugging or open the debug view in VS Code and press the green “Play” button.
You’ll then see a new VS Code instance load up with the title “Extension Development Host” that has your extension running within it. Open the command palette using the keyboard shortcut CTRL/CMD + SHIFT + P and type lister to see the available command for our extension.

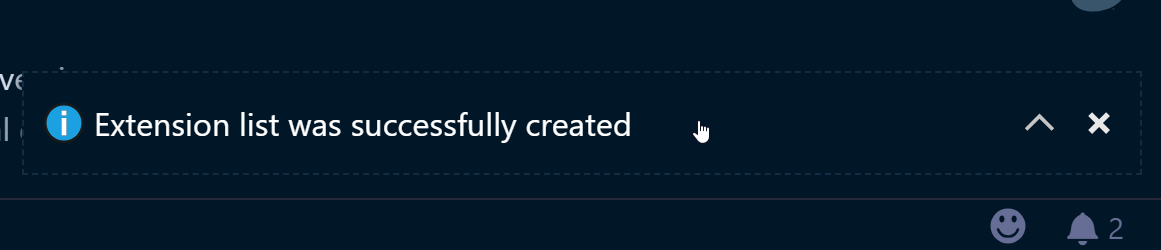
Press the “Enter” key on your keyboard and you should be prompted to choose a location and name for your file. Pick a location and name for your file and click the “Save” button. You should see a success notification pop up in the bottom right-hand corner of VS Code.
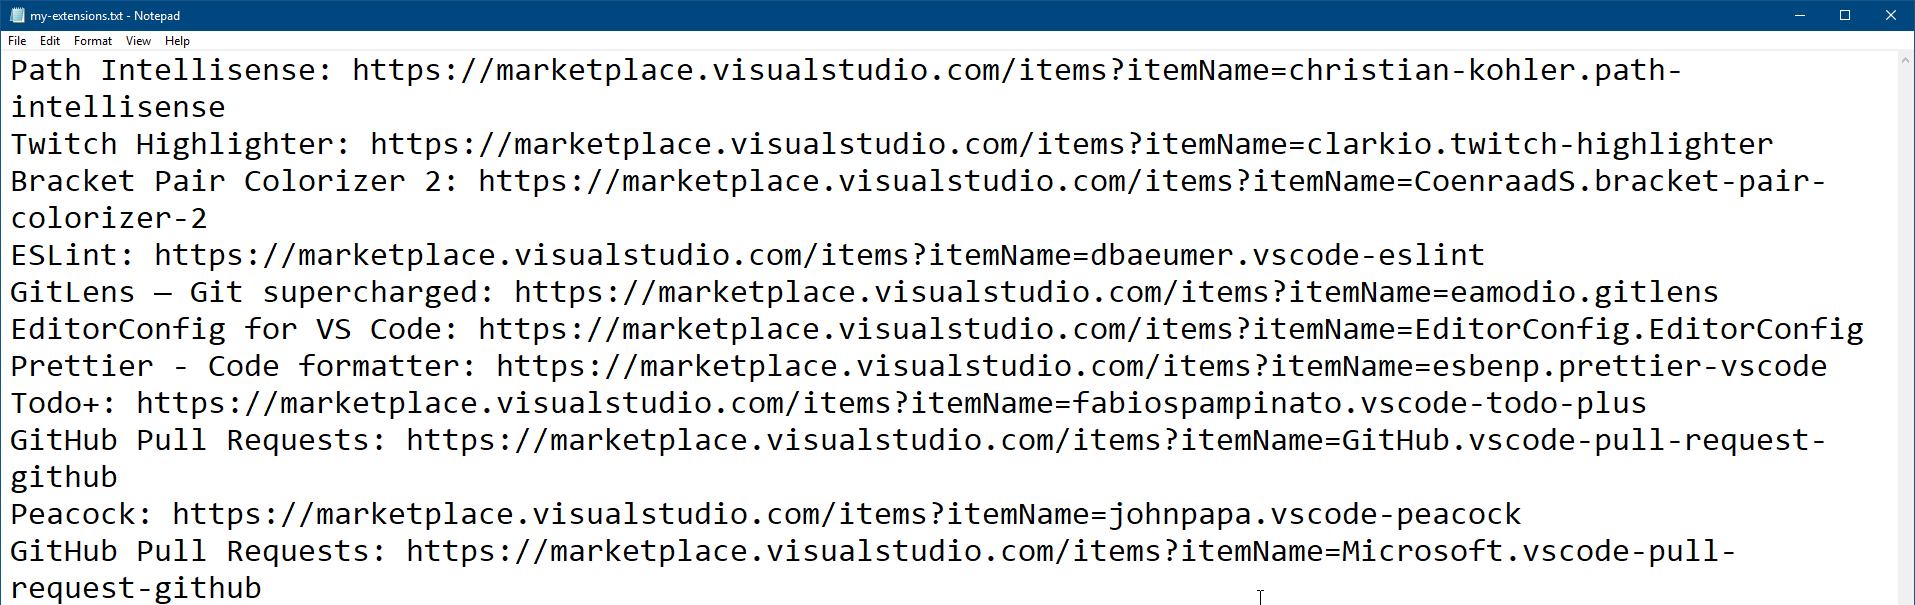
Just to make sure go to where you saved the file and open it to see the contents. You should see the full list of active extensions you’re using with their marketplace URLs.
Congrats you’ve created another VS Code extension and one that adds new functionality!
How do I publish the extension?
Rather than write that same information again here take a look the Publishing Extension documentation. The documentation provided on the VS Code website is pretty straightforward and easy to follow so check that out for further details.
Where do I go to find out more?
The best place to read up more on VS Code extension development is at the official VS Code API Docs site. There you’ll find a table of contents on the left-hand side that is expandable and breaks out important topics around extension development.
Closing
If there are more questions you have that haven’t been answered here let me know in the comments. I’ll check in regularly and follow up with a response or a post if it’s more appropriate in that format.
Thanks for reading this post and I hope you found it helpful.
Get connected on: